Getting Started-cn
English | Dansk | Deutsch | Español | Suomi | Français | Magyar | Italian | Nederlands | Russian | 简体中文
Contents
aMule是什么
aMule 是 p2p, 或者点对点(peer-to-peer)客户端,用于 eD2k网络,即一般称为电驴网络或者eD2k网络 (eDonkey2000)。本指南不需要您了解这些网络(不过了解了更好),不过确实需要在您的电脑上安装了aMule。
如果您还没有安装aMule,请参照针对您系统的正确的指南。在主页面可以找到那些指南的链接。
第一次运行 aMule
首先,运行aMule。这可以通过在控制台(console)中执行命令amule 或者
一旦开始,如果您运行的是SVN 版本,aMule会显示一个提示,提醒您这是第一次使用。阅读那个来了解您在使用的是什么 ;)
请注意aMule充分利用了右键菜单,所以如果您找不到某个功能,试着右键点击您想操作的条目。
配置 aMule
在您分享文件之前,您需要正确的配置aMule。这包括连接速度和限制,使用的文件夹,代理,端口设置和其他的设置。 您可以点击aMule窗口顶部的选项(Preferences)图标进入aMule 选项。在Macintosh(Intel)平台,点击顶部工具栏中的"工具(tools)"图标。
连接速度
您应该知道eDonkey客户端会强制上传数据。这意味着为了下载其他,您必须要共享您自己的数据(如果您什么也没有也不用担心)。强制会以两种方式:
- 您下载速度取决于您上传速度。如果您的上传速度设置低于10kb/s,您最大的下载速度将会是您上传速度的3-4倍(阅读 这篇 了解更多),所以如果您限制您的上传速度为5kb/s,您只能得到20kb/s的下载速度。
- 部分下载到得文件也可以分享。当您即使接收到一小块 数据块 时您将自动开始分享文件(一个 数据块 是9.28Mb的文件碎片)
注意:如果您到aMule 论坛 或者IRC 频道 抱怨这个,或者要求我们提高比例,对不起,小心我会抓到你并吃了你! -- Xaignar(含义很明显,别做那么两件傻事就行了!原话真的就是那个意思--译注)
当您第一次打开选项(Preferences)对话框,显示的页面会是"常规(General)",其中包含了一些常规的设置,如您的昵称,即当别人从您这下载数据或者上传到您那时看到您的名字。
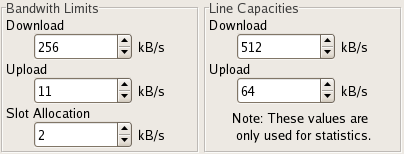
下一步,点击"连接(Connection)"的选项卡:
与这个唯一相关的设置是在"带宽限制(Bandwidth Limits)" 下面标记为"上传" 和 "下载" 的内容。您不需要输入最大的下载速度,但推荐您设置您的上传速度为您实际速度的80%,否则会导致下载缓慢。
记住速度的值通常是按照千位每秒(kilo Bits per second)[kb/s],但是在 "带宽限制(Bandwith Limits)" 里面的 '下载(Download)', '上传(Upload)' 和 'Slot Allocation' 的文本框中输入的是按照千比特每秒(kilo Bytes per second) [kB/s]。千位除以8就可以得到千比特。
示例:
最大下载流: 1024kb/s ÷ 8 = 128 kB/s

最大上传流: 512kb/s ÷ 8 = 64 kB/s
一旦您输入的正确的值,您查看其他剩下的设置。点击"确定(OK)"按钮保存修改。
ED2K 和 Kademlia
aMule 同样能连接到主机很少的Kademlia网络。它允许aMule和其他eDonkey2000客户端不必须依赖于通常的核心服务器也可以工作。Kademlia和基于服务器的ED2K网络默认是都可用的,但是您可以通过在“选项”下部分标题为'连接(Connection)'的关闭掉任意一个网络。上传速度较慢的用户可以考虑只启用两个网络中的一个,避免额外的负担。
连接到服务器
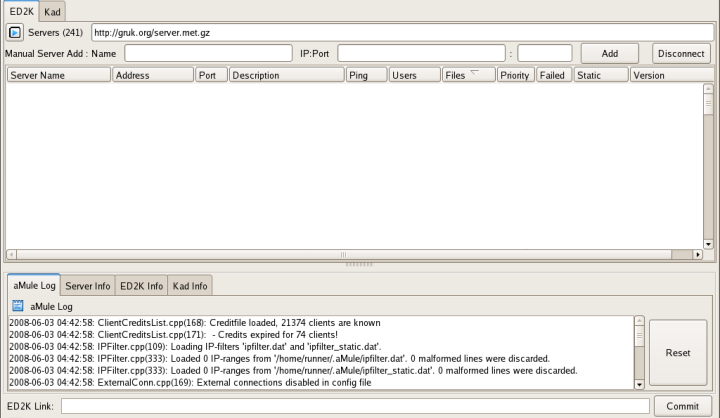
您现在应该在看服务器对话框:
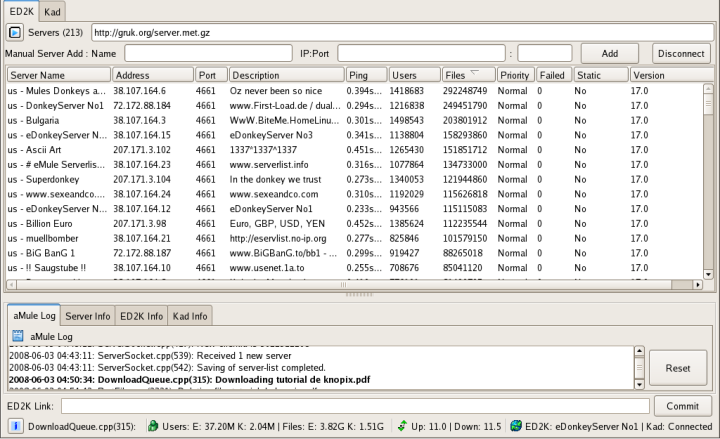
空白列表的位置应该包括您知道的服务器,但是这是您第一次运行aMule ,您一个也没有。为了改变这种情况,仅仅选中包含http://gruk.org/server.met.gz的文本框(您也可以使用网址 'http://peerates.net/servers.php' )然后点击回车。 A dialog will pop up and close again once the download has completed.
You should now have a full list of servers, if not search google for server.met, replace the url mentioned above and press enter to initiate the download.
Next you need to connect to a server. Normally it's a good idea to select one with as many users as possible, but for now, let's just click the large "Connect" button near the top-left of the window. This will connect you to a random server. Please wait while aMule contacts servers and tries to establish a connection. Once this happens, proceed on to the next section.
Connecting to the Kademlia Network
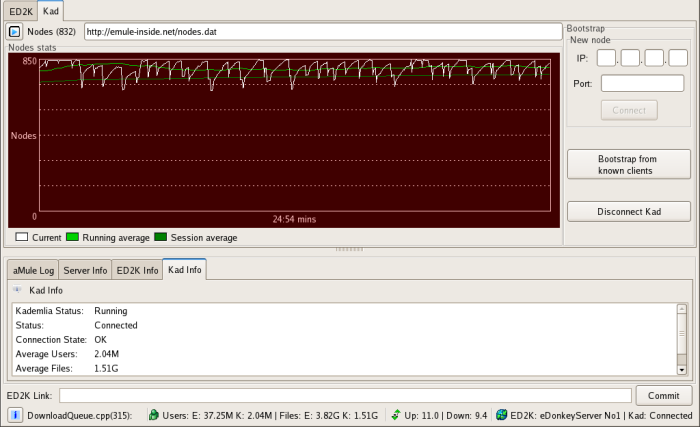
To connect to the Kademlia network, provided that it is enabled in the preferences, all you need to do is press the "Connect" button on the top toolbar. Note that manually connecting to a server (by double-clicking or right-clicking and selecting the 'Connect to server' item) won't connect you to the Kademlia network. Another way to connect to the Kademlia network is to enter the 'Kad' sub-page on the 'Networks' page, and press the 'Bootstrap from known clients' button. In case this is the first time you use Kad, you may want to update your nodes.dat file, by clicking in the Url textfield and pressing enter, or by clicking the "blue play button" http://forum.amule.org/images/bunfirlite/lastpost.gif by that bar. It is not necessary to do this again later, as the nodes list is kept up to date when aMule is running.
High and Low ID
Because p2p networks work by clients directly connecting to each other, being behind a firewalls, or routers that do not/cannot pass traffic on specific ports, can really cause problems. If you don't know whether or not you are behind a firewall, simply look at the globe icon in the bottom-right of the window. If its arrows are green, then you have High ID and can proceed, but if they are yellow, then you need to take a look at the page on Firewalls and/or common problems, since having a Low ID greatly reduces p2p experiences.
Basic Usage
This will cover some basic usage of aMule.
Searching and Downloading
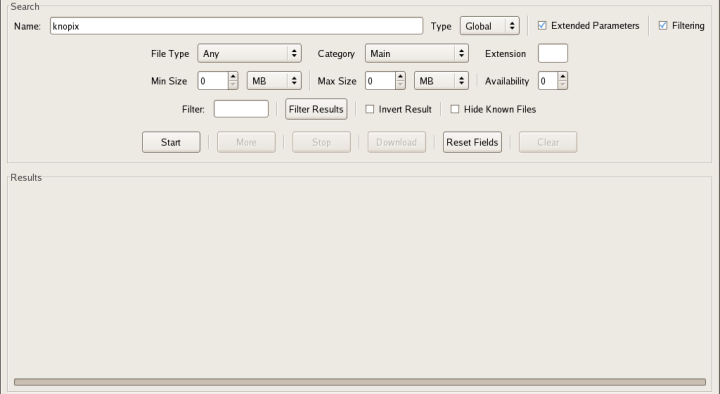
OK, this is what p2p'ing is about: Downloading files. For the sake of this guide, I'll presume that you are really keen on downloading the latest Knoppix CD (who isn't?). To download this, first ensure that you are connected to a server, or the Kademlia network, and then click on the "Searches" button.
This will bring up the search dialog:
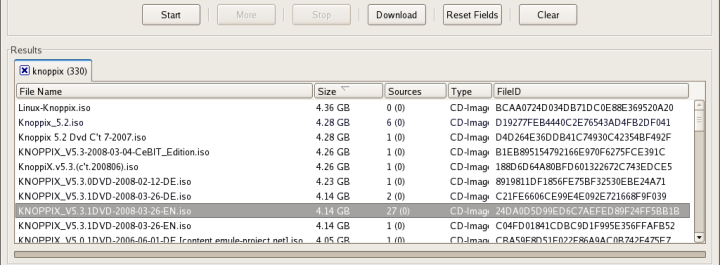
Since we only care about CD images, we select the checkbox "Extended Parameters" and select the option "CD-Images" from the "File Type" dropdown menu. If you are connected to an ED2K server, select the "Local Search" setting, since we don't really need to search anything other than the currently connected server. Otherwise, if you are connected to the Kademlia network, select the 'Kad' search-type. Then we enter Knoppix in the top "Name" field and hit enter or the "Search" button. You should now have a listful of results:
Let's sort the list by sources, by clicking twice on the field marked "Sources", this makes it easier to find popular files. The second one looks interesting, so we double-click on it (or click on it and then on the "Download" button). This will queue the file for download.
Results can be displayed in a number of colors, which signify the following:
- Blue represents the number of sources, the more sources the darker the blue.
- Red represents files that you are currently downloading.
- Green is for files you have downloaded or shared before, in other words files you already have.
Advanced Searches
Amule supports advanced or Boolean searches. These are searches that have AND, OR, or NOT as keywords in the search. Each boolean expression can be delimited by brackets "(" and ")".
Example:
(knoppix AND V5.1.1) OR (knoppix AND V6.0)
Filtering results
Many of the results you receive will be spam or complete rubbish. These can be filtered out using the filter field in the search dialog. This field accepts "regular expressions". The regular expression system it implements is that of the wxRegEx library. By default the filter is a search, it removes anything which does not match. This behaviour can be reversed.
Examples;
'porn|sex' Will filter any string which contains the text "porn" or "sex".
'^word' will filter any string which begins with "word".
'word$' will filter any string which ends with "word".
Search Types
I only mentioned 'Local' and 'Kad' searching above.
A local search only asks the server you are connected to, and is enough in most cases. However, if this does not return any results, you can ask all servers in your serverlist, by doing a 'Global' search. This however takes a lot longer (0.75s per server).
Lastly, you can search on the 'Kademlia' network via the 'Kad' search-type. Note that on the 'Kad' network, results signify complete sources, unlike 'ED2K' searches, where the source-count contains both complete and incomplete sources.
The Download Queue
Click on the "Transfers" button to bring forth a list of files you have queued for download:
If you're lucky, the progress bar will turn a nice dark shade of blue, which means that a lot of people have that file (read this to know more about it). Beware of files that have parts marked in red, since it means that no-one has that part of the file and you most likely wont be able to complete the download.
If you double-click on any of the files, you can see the sources you have found for that file.
Of Rows and Columns
These are the columns of the Download Queue:
- Filename
- The name of the file.
- Size
- The size of the file. The eDonkey2000 network supports files up to 4GB in size (read more about this).
- Transferred
- Shows the amount downloaded.
- Completed
- This column displays how much of the file you have actually completed. Please note that this can differ from the Transferred column because of corruptions or gains made by the compression *Mule clients use (read more about this difference).
- Progress
- This bar displays the current progress of the file, the colours signifying the following (alternative resource):
- Blue: How many sources provide this part, the darker the colour, the more sources provide it.
- Red: There are no known sources that provide this part.
- Black: You have already downloaded this part.
- Yellow: You are currently downloading this part.
- The green bar on top of the larger bar gives an indication of the actual progress.
- Sources
- There are 3 fields in this column, though mostly only 2 are shown (alternative resource):
- <Asked Sources>[/<All Sources>] [+ <A4AF Sources> ] [(<Transferring sources>)]
- 'Asked Sources' are those that have been asked for the file.
- 'All Sources' are all sources of that file, asked and unasked.
- 'A4AF (Asked For Another File) Sources' are sources that provide that file, but have been asked for anther one.
- 'Transferring sources' are sources which are uploading that file to you at this very moment.
- Priority
- The priority of the file. Files are set to auto-priority by default, which means that aMule will manage it by itself. Priorities affect how aMule allocates sources that are known to provide multiple files and thus means that high-priority files get more sources. Read more about this.
- Status
- The current status of the file. Waiting means that you are waiting for sources to start uploading to you.
- Time Remaining
- A guess at how fast the file will be completed. Only shows something when you are currently receiving the file.
- Last Seen Complete
- This shows the last time you've seen the entire file provided by the sources you've asked.
- Last Reception
- This shows the last time you were downloading parts of this file.
The Upload Queue
The upload queue can be found just beneath the download queue, and shows who are downloading files from you (you might want to read this). In case you are wondering, no, you cannot stop uploads. If you click on the blue icon next to the "Uploads" label, you can see who are queued for downloading from you, rather than the people who are actually downloading from you right now.
图标以及其含义
在Transfers界面会有一些图标。
- 源资源状态
- http://www.amule.org/dev-up/Source_1.png - 此客户端正在给您发送文件或者哈希集 .
- http://www.amule.org/dev-up/Source_2.png - 您正在在该客户端的队列中或者正在请求文件.
- http://www.amule.org/dev-up/Source_3.png - 您正在连接到该客户端.
- http://www.amule.org/dev-up/Source_4.png - 正在向该客户端请求其他文件,没有所需文件或者因为低 ID 原因无法连接到.
- http://www.amule.org/dev-up/Source_5.png - 状态未知。
- eDonkey 客户端
- http://www.amule.org/dev-up/Client_aMule.png - aMule
- http://www.amule.org/dev-up/Client_eDonkey.png - eDonkey2000
- http://www.amule.org/dev-up/Client_eMule.png - eMule
- http://www.amule.org/dev-up/Client_Friend.png - Client is a Friend
- http://www.amule.org/dev-up/Client_Lphant.png - lphant
- http://www.amule.org/dev-up/Client_MLDonkey.png - mlDonkey
- http://www.amule.org/dev-up/Client_Shareaza.png - Shareaza
- http://www.amule.org/dev-up/Client_Unknown.png - 未知 [[Client]|客户端]
- http://www.amule.org/dev-up/Client_xMule.png - xMule
- Modifiers
- http://www.amule.org/dev-up/Client_Mod_eMuleProt.png - 此客户端 支持扩展的 eMule 协议。 Source-sharing and such.
- http://www.amule.org/dev-up/Client_Mod_GoodCredit.png - 此客户端 是良好的 信用等级。
- http://www.amule.org/dev-up/Client_Mod_NormCredit.png - 此客户端 是正常的 信用等级。
- http://www.amule.org/dev-up/Client_Mod_SecId_Good.png - 此客户端 已经过 安全确认(securely identified)。
- http://www.amule.org/dev-up/Client_Mod_SecId_Bad.png - 此客户端因为某些原因被确认为是 坏家伙(BAD GUY)。
Categories for Downloads
It is possible to assign downloads to a category, which can have a unique color on the download listctrl, and can be saved to a different folder than the default one.
To add a new category, right-click (and hold) on the tab titled 'All', which is located next to the green tick, just below the toolbar on the Transfers page. Then select 'Add Category' and fill in the desired details. A random color is selected by default, but this can be changed.
To add a file to a category, right-click on it in the download listctrl, and select the desired category in the "Assign to Category" submenu. The item 'Unassigned' will assign it to the default category.
When categories are added, a matching tab is added next to the original 'All' tab. Left-clicking on these will change the display to only display files assigned to this category. As a final note, the default view, the 'All' tab, allows for various forms of filtering. These can be accessed by right-clicking on the tab and selecting from the 'Select view filter' submenu.
Where Are The Files?
Once aMule starts downloading a file, it will create a number of files to keep track of that specific download. These files can be found in the subdir .aMule/Temp in your homedir (~/.aMule/Temp) on Linux and in ~/Library/Application Support/aMule/Temp on Mac OS X, but should not be touched in most cases.
If you have incompleted downloads from eMule, you can simply place the temp files in that Temp directory if you wish for aMule to continue downloading them.
However, once a file has been completed, it will be moved away from Temp and to ~/.aMule/Incoming (Linux) or ~/Library/Application Support/aMule/Incoming (Mac OS X), where all completed files are placed by default. You can change both of these paths in the preferences should you wish to do so.
Also, please note that on Linux, the .aMule directory is a hidden directory, so you might have to enable showing of hidden files in your file-mananger, should you use one such.
On Windows aMule uses the place suggested by the operationg system. For XP this is usually C:\Documents and Settings\your name\Application Data\aMule (named differently for non English versions), for Vista C:\Users\your name\AppData\Roaming\aMule.
You can always change (or locate...) the path of your temp and incoming files in Preferences/Directories.
If there is a subdir config in the directory where the aMule executable lies, the configuration files are stored and looked for there, so you could run it from a USB memory.
分享文件
首先要注意,eDonkey2000网络本不是用来 分享像声频片段这样小文件的,而是用来更优化分享发布大的文件。同样要注意,在分享任何文件材料时没有违反您本地的法律,否者是您的责任。
在aMule中有两种方法分享文件:
第一种是将 文件放在在 "Incoming"文件夹下(在 Unix类似的系统中为~/.aMule/Incoming)。这完成后,您必须或者重新启动 aMule或者点击文件分享( SharedFiles )页面的 "重新载入(Reload)"按钮。
第二种方法是将 需要分享的目录加入到 [[aMule]会寻找 分享的文件。这需要点击"设置(Preferences)" 按钮然后选择"目录(Directories)" 项。
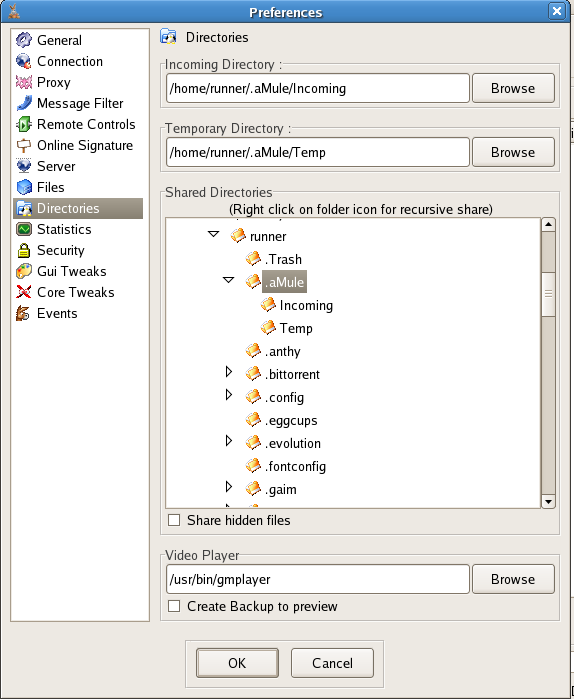
从那里您会看到通过目录树查看到您希望 分享的目录。双击将要分享的 文件夹图标,然后右键点击文件夹图标会递归的将文件分享。
结论
Hopefully this brief introduction has given you an idea of how aMule works. If you feel that something is missing from this guide, please let us know or add it yourself. 希望这个简单的介绍已经解释了 aMule如何工作的,如果您感觉在此指南中缺少什么内容,希望通知我们或者您自己添加进来。
